Oh I love Autumn, it's one of my favourite season. The weather's cool, the leaves are starting to turn yellow and red...sigh...I just love it.
Talking about red, I've posted about OPI's Royal Rajah Ruby a couple of times before. It's a beautiful deep reddish brown that goes really well with the autumn theme. I've used it the last 2 times over nail tips and this is the first time I'm applying it directly over my natural nails. As with most OPI nail polish it's very easy to apply without any issues.
I saw this nail art on a nail magazine and really wanted to try it. However, I keep putting it off because it seems like a lot of work. This set of nails were created by layering different types of nail art materials over each other. If you've looking for a less complicated look, you can stop at any stage and it'll still look nice. I'm going to show you how I've created this nail art step by step.
After appling 1 coat of ridge filler and a base coat, I've applied 2 coats of Royal Rajah Ruby.

Apply 1 layer of top coat. Then use a brush, to pick up some silver glitter and apply to the top half of your nails only. If you don't like complicated looks you can just stop here. I think it looks so pretty with just the glitter on.


Using some silver striping tape, apply 2 lines of tape diagonally across each nail. Alternate the direction of the diagonal strips on each nail so it doesn't look too consistant. Use a very small pair of scissors to cut the striping tape so that it's as close to the corners as possible.


Gather all the acrylic powder colours required to create the 3D flowers. Remember to keep the room well ventilated.

First dip your brush in the monomer and drain off the excess. Then, dip the tip of your brush at an angle into the white acrylic powder first then into the coloured acrylic. You just want to gently touch the surface of the powder. Don't drag your brush along the surface of the powder or else you'll not be able to pick up a nice round ball. Create a 5 petal flower first then layer a 4 petal flower ontop of it. Using the same double dip method, create the leaves.

You want to create craters like this across the acrylic powder.

Repeat the same process for all 10 fingers. You'll notice that the flowers have a matte look at the moment. Later on it'll look a lot more shiny when you coat it with gel to finish.

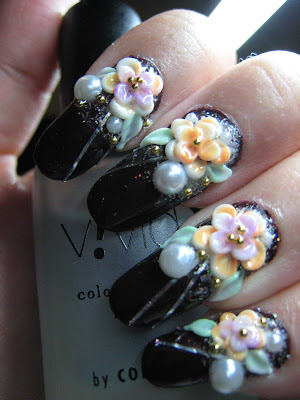
Using large and medium size pearls, apply them randomly on all 10 finger nails. I've also used gold bullions to decorate the centre of each flower and around it as well. To make it secure, I'm using nail glue to apply the pearls and bullions.

The matte flowers without gel top coat.
 Apply 1 coat of gel and cure it under a UV lamp. This is the finishing touch to seal your 3D flowers. The gel makes it look a lot more shiny, at the same time it helps to protect the acrylic flowers and make it last longer.
The pictures below were taken on day 3 under filtered sunlight. I had to apply some extra glue where the tape meets the edge of the nail to prevent it from lifting.


 Hope you like this step by step guide on how to create this look :)
Talking about red, I've posted about OPI's Royal Rajah Ruby a couple of times before. It's a beautiful deep reddish brown that goes really well with the autumn theme. I've used it the last 2 times over nail tips and this is the first time I'm applying it directly over my natural nails. As with most OPI nail polish it's very easy to apply without any issues.
I saw this nail art on a nail magazine and really wanted to try it. However, I keep putting it off because it seems like a lot of work. This set of nails were created by layering different types of nail art materials over each other. If you've looking for a less complicated look, you can stop at any stage and it'll still look nice. I'm going to show you how I've created this nail art step by step.
After appling 1 coat of ridge filler and a base coat, I've applied 2 coats of Royal Rajah Ruby.

Apply 1 layer of top coat. Then use a brush, to pick up some silver glitter and apply to the top half of your nails only. If you don't like complicated looks you can just stop here. I think it looks so pretty with just the glitter on.


Using some silver striping tape, apply 2 lines of tape diagonally across each nail. Alternate the direction of the diagonal strips on each nail so it doesn't look too consistant. Use a very small pair of scissors to cut the striping tape so that it's as close to the corners as possible.


Gather all the acrylic powder colours required to create the 3D flowers. Remember to keep the room well ventilated.

First dip your brush in the monomer and drain off the excess. Then, dip the tip of your brush at an angle into the white acrylic powder first then into the coloured acrylic. You just want to gently touch the surface of the powder. Don't drag your brush along the surface of the powder or else you'll not be able to pick up a nice round ball. Create a 5 petal flower first then layer a 4 petal flower ontop of it. Using the same double dip method, create the leaves.

You want to create craters like this across the acrylic powder.

Repeat the same process for all 10 fingers. You'll notice that the flowers have a matte look at the moment. Later on it'll look a lot more shiny when you coat it with gel to finish.

Using large and medium size pearls, apply them randomly on all 10 finger nails. I've also used gold bullions to decorate the centre of each flower and around it as well. To make it secure, I'm using nail glue to apply the pearls and bullions.

The matte flowers without gel top coat.


The pictures below were taken on day 3 under filtered sunlight. I had to apply some extra glue where the tape meets the edge of the nail to prevent it from lifting.


Comments (24)
Jin you almost got all of my fav on nails~ Love love love the flower pattern~ @v@
and i so love matte feel that i especially love to stare on acrylic flower before the top coat..
And pearls!!!! 珍珠 always look so elegant and classy~ yee~~^^
Hi there! What an awesome looking nail design! Your nails looks great! Can I ask what brand of gel you used? And also where do you get your supplies from?
wow!!! ur nails are getting long...I love this design so much...
This is absolutely, drop-dead gorgeous! You are so talented!!
:B
~Tiffani
Oh Jin! You are so talented, you really should be paid for these nails, they are stunning. I love Rachel's comment and have to agree with her. I love everything on the nails though ;) Beautiful work!!
Thank you Rachel, I like using pearls for nail art. You're so correct, it instantly brings up a classy and elegant feel. It's my first time using large ones like these. Only thing you have to be careful is that the pearlish layer in the bead will wear off easily. Remember to put lots of top coat over it.
You are so good with the acrylic! I love this look :)
Hi Taryn, the top coat gel I used here is from this brand called Gracia. I get my supplies from all over the place. Some from a local salon supplier friend and some from overseas. When my friends goes back to their hometown in Japan or HongKong, I pass them a shopping list! Japan has the best nail art supplies! I also go to craft stores to look for all sorts of accessories to attach onto my nails. The big pearls you see here were purchased from a paper and wedding card making store.
Thank you Thriszha! My nails were even longer than this before I created this nail art. When I removed my previous design, I kept looking at my nails in wonder because it was absolutely the longest I've ever had (but it's curling like crazy)! I was afraid to snap them and the length was getting a bit cumbersome so I've filed it down. There's already a largeish crack on my right thumb. I've used lots and lots if glue to repair it. Hope I don't have to cut it off!
Tiffani, thank you so much! This set of nails were really time consuming to creat. I took a break inbetween to rest my eyes, hands and neck! The striping tape were especially tricky to apply with just one hand. I'm glad you like them :)
Thank You Danielle! Yes, I should start charing people for my nail art hehe. I have many friends asking me to create nails for them. Maybe I can quit my current job and become a full time nailist working from home! Wonder if there's a market here for these type of nail art. Also wonder if anyone is willing to sit for 3 hours or more to get them done? By the way, how's your airbrush purchase going?
Thank You Kae! I was afraid there will be too many colours when I lined up all the materials I needed. I'm glad it turned put well ;)
Oh my! Those flowers are gorgeous! Thank you for posting such a beautiful mani!
Oh wow they look great Jin! Your flowers always look so lovely :D
Hi ainos2, thank you! I've already got friends asking me to recreate this set of nails for them!
Thank you Violet! I am hoping to try making 3D bows. If successful, I'll make a tutorial on it.
Amazing talent & beautiful color combination. I admire your patience in doing this creative nail art on all 10 fingernails (I suppose).
Looking forward for more creative designs
On another note your long nails are beautiful, yet the square shaped nails looked awesome on your hands
Hi Kami, thank you for your comments! I really appreciate it :). You are correct, I always do my nail art on all 10 fingernails. It was really difficult at first but now my left hand is getting used to it. However it still takes quite long to complete. This set took me about 4 hours. Without including time spent removing my previous nail art. I am thinking of going back to square nails for my next nail art. I've been busy creating nail for others, my own nails are a mess now :(
Hey Jin, how are you :) I'm sorry that i haven't popped by for a while, just incase you didn't notice, my blog's layout needs a doctor, it's seriously sick, my side bar is totally gone phycological...
Anyway lovely nails, i love the ruby it's very AW... your flowers looks like those on a cup cake :) good enough to eat :)
Hi Ena, now that you mention it, it does look like flowers on cupcake! This is one of my fav colours! I just removed them last night after wearing it for almost 3 weeks. Trying out the OPI suede nail polish now. I'm trying to get used to the non shiny look.
Yes, I noticed your blog issue. Have been reading all your posts. The other day when u posted your 'rara' skirt, it reminded me of a similar one I had. We should wear them out together next time. Hope to catch up with you soon!
Dear Jin,
You never fail to amaze with yr painstaking efforts. The Ruby colour is really nice & cool. Yes definitely there's a market for it. If you can complete a whole handbook of tutorial on these designs including 3D bows, find a publisher & sell it thru' the internet via yr own blog.
Popular requests already keeping you sooo busy ...
Aunt Eve
can u apply that acrylic designs on your own nails? or is it best to d it on fake nails, or after the acrylic nail process?
Hi gmorales, the answer is yes to all 3 options you mention. For most of my design, I apply it directly to my own natural nails after I have applied nail polish. If you do it yourself it's a bit harder cos you gotta train your left hand (if u are right handed) to draw and mould 3D nail art. If you want the design to last a lot longer, applying acrylic designs to fake nail tips and ontop of acrylic nails is a better option. It really depends on what you like really.