This is my first attempt to create a tutorial, as requested by Danielle from The Diva's Polish. It's not easy trying to take photos and draw at the same time, however I hope you'll get some insight into how the 3D acrylic flowers are made. Please let me know if you've got any questions.


One of my new purchase. OPI - Royal Rajah Ruby.

Beautiful dark burgundy with tiny sparkles (2 coats).

1 coat Colour Club Vivid Colour Intensifying Top Coat.

Items used: Nfu.Oh Monomer, Nfu.Oh White Acrylic Powder, Size 4 Kolinsky Nail Art Brush, Dappen Dish

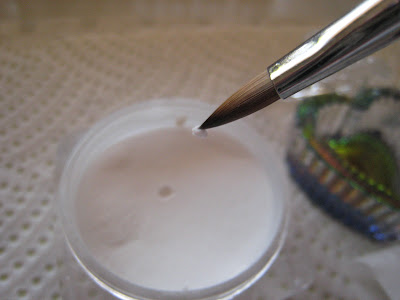
Pour some monomer into the Dappen Dish. Dip your brush into the monomer.
Note: Make sure your room is well ventilated because the Monomer smells really bad and inhaling in large quantities is really bad for your health.

Push your brush against the side of the dish to remove excess monomer.

Note: The brush used is flat with a pointed tip.

Dip your brush into the acrylic powder and pick up a tiny ball of acrylic. Depending on the size of the flower you're creating, the amount of acrylic picked up will differ. The longer your brush stay in the acrylic powder, the more it will pick up. The brush cannot be too wet or else you'll get a runny blob of acrylic. If it's too dry, the acrylic powder will fall all over the place and it'll be too hard to mould into shape. This comes with some practice, but you'll eventually get the hang of it.

Place the blob of acrylic ball onto the surface of the nail. It should be of a sticky consistancy.
If it's a little bit too wet, you can allow it to sit for a while before moulding. Sometimes you may need to dry your brush a bit on a piece of tissue before proceeding to mould the acrylic into shape.

I'm creating a simple flower here. All you need to do is to push your brush at an angle (see above) against the acrylic ball. You may need to drag your brush slightly against the pointy part to create the desired effect.

Repeat the same process with the rest of the petals.

The flower will start to take shape.

Depending on how big your petals are and how far apart you place them, this will determine how many petals you'll get on your flower.

To complete the look, I'm going to add a tiny yellow acrylic ball in the centre of the flower. Using the same technique as above, wet your brush and pick up a tiny ball of yellow acrylic powder.

You have to be very quick when picking up a small amount of acrylic.

Flower Complete!

I have heaps of monomer left in the Dappen Dish, so I made another flower.

This is a slightly more complicated design. I'll create another tutorial for moulding the rose next time.

I hope this tutorial is beneficial in helping you with your 3D acrylic flower design.
Monday, March 01, 2010 |
Category:
3D Acrylic,
Artificial Nails,
Brown,
Colour Club,
Nail Art,
OPI,
Red,
Tutorial
|
20
comments


Comments (20)
Thank you Jin!! :) great tutorial! I would need to practice so much to have my flowers looking like yours! When winter sets in I may try it. I never really like to polish in the heat :( Beautiful work - I adore the rose and it looks stunning against the deep red base!!
Oh such a great tutorial! I always fail at acrylic work on nails :( I think you've inspired me to try again though, it's all about practice!
thank you, thank you, THANK YOU *sings loudly* I think I might be able to do this.....
I always love your flowers...
Can you suggest another brand (less expensive for practice???) of acrylic)
:B
~Tiffani
Thank you Danielle! I try to practice whenever I attempt a new design. Just remember to keep your windows open and wear a mask if possible. Yes I am looking forward to cooler weather too. It's almost impossible to do anything in this heat!
Hi Violet. I am glad that this tutorial has inspired you to try acrylic nail art again. Once you get the consistancy right, moulding it into shape is not too difficult. You're really artistic and creative, I'm sure you'll be able to do it with some practice.
It's always so warm and hot and sweating over my country and it's getting worse.. T.T
i tried doing acrylic myself before and you really need mask! i feel like i'm the doctor doing operation haha... nice flower especially the second one~ ^^
Thank You Tiffani for your compliments! I am so happy that you'll try to attempt this. As for other brands of acrylic, the only other brand I've used is Gracia. When I first started out with 3D nail art, I did try using a cheaper brand. However I don't seem to be able to locate the brand name as I've threw away the packaging. Just be careful with the 'no brand' acrylic. I heard some may contain nasty chemicals.
Hey Rachel yes I know how it feels living in the tropics. There are only 3 seasons. Hot, hotter, hottest. Hehehe. It's the humidity that makes it so uncomfortable. Whenever I go back to Singspore, it always takes me at least 2 weeks to used to it. Yah I feel like a surgeon too whenever I wear my mask while using acrylics. Hehe.
Thank you so much for your tutorial, you're so talented with your brushes, you'll need to handle them really precisely to have that flower!!!
Hi Ena, there are days when my hands refuse to listen to me and I end up with really funny looking flowers haha. It takes some effort to practice making these 3D nail art, however the end result is really worth it! I have just learn't a new nail art technique! Really excited about it. Will share it on my blog once I get some practice making it.
Ohmygoodness! Your tutorial was great ! Gee.. Do you mind doing more of it? Your 3D acrylic is sooo good ! I'm still practising my simple 5-petal one now. Your nail art on Jan 24 was fantabulos!! Love it !!
Hi Melissa, I'm glad you find the tutorial helpful. I am planning to do a couple more, stay tuned! ;) Thank you for your compliments on the 'Sweet Pink Wedding Nails' post. It's also one of my favourite :)
hi i really like your tutorial,i'm trying to practice and learning how to do 3d flower. i use a small brush too and the regular acrylic liquid.. some how it doesn't work out well.. i was wonder what kind of chemical liquid did you used to make the flower stay s0o steady and nice? i really really love to learn how to do 3D flower
Hello sorry about the super late reply. I use this liquid called monomer. Usually, I use the monomer and acrylic powder from the same brand to create my 3D nail art. I try not to mix different brands cos the chemicals may be different. What's the current issue you're facing with the 3d nail art? Maybe I can provide some assistance?
Hello! Can I ask you the name of the support? I seek support but I found none. I love your blog:)
Hi Mukahi thank you for visiting my blog. If you have any questions please feel free to email me directly on jinjinadventures at gmail dot com.
where did you get your dappen dish?
its beautiful!!!
Hi Candice, I got my dappen dish from a local nail product supplier. But I am sure you can find similar ones anywhere online.
Hi orange mango, sounds like you do not have enough monomer on your brush. Try soaking the entre brush in monomer first then tap your brush on the edge of the dish to get most of it out. It also depends on how big a ball u want to pick up, the bigger the ball, the more monomer you must have left on the brush. It's a balance and one that comes with some practice. I am sure you will get the hang of it.