Oh I love Autumn, it's one of my favourite season. The weather's cool, the leaves are starting to turn yellow and red...sigh...I just love it.
Talking about red, I've posted about OPI's Royal Rajah Ruby a couple of times before. It's a beautiful deep reddish brown that goes really well with the autumn theme. I've used it the last 2 times over nail tips and this is the first time I'm applying it directly over my natural nails. As with most OPI nail polish it's very easy to apply without any issues.
I saw this nail art on a nail magazine and really wanted to try it. However, I keep putting it off because it seems like a lot of work. This set of nails were created by layering different types of nail art materials over each other. If you've looking for a less complicated look, you can stop at any stage and it'll still look nice. I'm going to show you how I've created this nail art step by step.
After appling 1 coat of ridge filler and a base coat, I've applied 2 coats of Royal Rajah Ruby.

Apply 1 layer of top coat. Then use a brush, to pick up some silver glitter and apply to the top half of your nails only. If you don't like complicated looks you can just stop here. I think it looks so pretty with just the glitter on.


Using some silver striping tape, apply 2 lines of tape diagonally across each nail. Alternate the direction of the diagonal strips on each nail so it doesn't look too consistant. Use a very small pair of scissors to cut the striping tape so that it's as close to the corners as possible.


Gather all the acrylic powder colours required to create the 3D flowers. Remember to keep the room well ventilated.

First dip your brush in the monomer and drain off the excess. Then, dip the tip of your brush at an angle into the white acrylic powder first then into the coloured acrylic. You just want to gently touch the surface of the powder. Don't drag your brush along the surface of the powder or else you'll not be able to pick up a nice round ball. Create a 5 petal flower first then layer a 4 petal flower ontop of it. Using the same double dip method, create the leaves.

You want to create craters like this across the acrylic powder.

Repeat the same process for all 10 fingers. You'll notice that the flowers have a matte look at the moment. Later on it'll look a lot more shiny when you coat it with gel to finish.

Using large and medium size pearls, apply them randomly on all 10 finger nails. I've also used gold bullions to decorate the centre of each flower and around it as well. To make it secure, I'm using nail glue to apply the pearls and bullions.

The matte flowers without gel top coat.
 Apply 1 coat of gel and cure it under a UV lamp. This is the finishing touch to seal your 3D flowers. The gel makes it look a lot more shiny, at the same time it helps to protect the acrylic flowers and make it last longer.
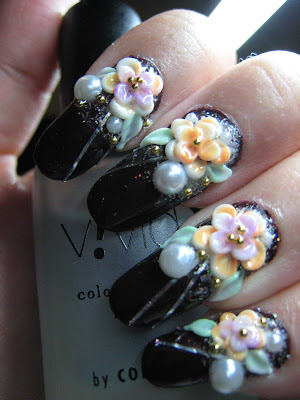
The pictures below were taken on day 3 under filtered sunlight. I had to apply some extra glue where the tape meets the edge of the nail to prevent it from lifting.


 Hope you like this step by step guide on how to create this look :)
Talking about red, I've posted about OPI's Royal Rajah Ruby a couple of times before. It's a beautiful deep reddish brown that goes really well with the autumn theme. I've used it the last 2 times over nail tips and this is the first time I'm applying it directly over my natural nails. As with most OPI nail polish it's very easy to apply without any issues.
I saw this nail art on a nail magazine and really wanted to try it. However, I keep putting it off because it seems like a lot of work. This set of nails were created by layering different types of nail art materials over each other. If you've looking for a less complicated look, you can stop at any stage and it'll still look nice. I'm going to show you how I've created this nail art step by step.
After appling 1 coat of ridge filler and a base coat, I've applied 2 coats of Royal Rajah Ruby.

Apply 1 layer of top coat. Then use a brush, to pick up some silver glitter and apply to the top half of your nails only. If you don't like complicated looks you can just stop here. I think it looks so pretty with just the glitter on.


Using some silver striping tape, apply 2 lines of tape diagonally across each nail. Alternate the direction of the diagonal strips on each nail so it doesn't look too consistant. Use a very small pair of scissors to cut the striping tape so that it's as close to the corners as possible.


Gather all the acrylic powder colours required to create the 3D flowers. Remember to keep the room well ventilated.

First dip your brush in the monomer and drain off the excess. Then, dip the tip of your brush at an angle into the white acrylic powder first then into the coloured acrylic. You just want to gently touch the surface of the powder. Don't drag your brush along the surface of the powder or else you'll not be able to pick up a nice round ball. Create a 5 petal flower first then layer a 4 petal flower ontop of it. Using the same double dip method, create the leaves.

You want to create craters like this across the acrylic powder.

Repeat the same process for all 10 fingers. You'll notice that the flowers have a matte look at the moment. Later on it'll look a lot more shiny when you coat it with gel to finish.

Using large and medium size pearls, apply them randomly on all 10 finger nails. I've also used gold bullions to decorate the centre of each flower and around it as well. To make it secure, I'm using nail glue to apply the pearls and bullions.

The matte flowers without gel top coat.


The pictures below were taken on day 3 under filtered sunlight. I had to apply some extra glue where the tape meets the edge of the nail to prevent it from lifting.


